Showing posts with label chocolate. Show all posts

Monday, February 15, 2010

Valentines

We are getting ready for a homeschooling party.  Lots of fun stuff going on in the kitchen.
Lollipops, for one.


A whole crew of helpers!
Note the baby in the jumper :)

Yes, I still have my Christmas cards up.  I love Christmas cards sooo much!  I keep them forever.  Usually I don't display them quite this long though.  ahem.


Ready to give away.
 

Now for the chocolate goodies.  My fave.
Chocolate-covered Oreos.  Easy, peasy with these ingenious things.


Chocolate brownies.  So much work, but so very cute.   
I want to make these again right NOW!  I baked them in a 9x9 pan, cut out heart shapes using a small heart-shaped cookie cutter, then dipped each one in chocolate glaze before sprinkling decorations on top.  Delicious.
 
  
For the glaze:  4 oz chocolate + 1/4 cup butter (no substitutes!) + 1 TBS honey or corn syrup.  Melt together and stir til smooth.

Let the party begin!


Monday, July 6, 2009

Chocolate Sauce FAIL!

Isn't this a sad sight? Positively depressing.

This was an attempt to surprise and reward my children for being such good helpers during a very hectic week. I had five million things to do, and they had all pitched in and did the things I asked, without complaining.

I didn't tell them they'd be rewarded. My original plan was to drive through Wendy's and buy a round of Frosties. But then I thought about how long it takes to get everyone in the car. I contemplated the possibility that the teeny baby might not cooperate in the car (he's very unpredictable!), and decided homemade is the way to go. I was cooking for a party anyway--what was another dirty pan?

Why I reached for, and more importantly used, the saucier instead of the double-boiler, I do not know. I'm pretty sure it had something to do with the string of mostly non-sleeping nights that preceded this day--and all the way back to the day before Declan was born. But no matter. The fact is, I was using the wrong pan. The chocolate burned and there was no saving it.

It pains me to remember.

After doing away with the contents of that pan, I tried again. This time I used the double-boiler and got better results. Nothing spectacular, but it was edible. Clearly, I need more practice. Sorry I didn't take any photos. New baby in the house = Mom's not herself. I'm happy to report that the sundaes were devoured with great zeal. No pictures of that either. I'll get better. I'm sure I will. Pretty sure, anyway.

Thursday, April 9, 2009

Chocolate Coconut Easter Candy

This is a recipe from my childhood. Mom made these at Easter only, and I remember vividly sitting perched on a kitchen stool next to the stove watching her dip them. She wasn't fond of working with melted chocolate, to say the least. I remember hearing a lot of French phrases during these candy-making sessions. That was never a good sign. But, these eggs were so good that I'm sure she thought that they were worth the effort.

The recipe couldn't be more simple.  All you need is:

The Creamy Centers
1.5 lbs powdered sugar
1 cup butter, softened
1/2 tablespoon vanilla extract
3 oz shredded coconut (sweetened or unsweetened--your choice)

Mix all ingredients together thoroughly by hand. It should look like this when you're done.

Wrap in plastic wrap and chill in the refrigerator for about two hours.

Remove from fridge and form into egg-shapes. These can be any size you wish. I used a teaspoon to try to get them uniform, but a candy mold would do a much better job.  Work quickly--this stuff will get sticky in a hurry.

Cover and return to the refrigerator while you prepare your double-broiler to melt some chocolate. Any chocolate will do. Here I am using Nestle's Toll House Morsels.  When I have it, I use Scharffen Berger dark chocolate.

Dip each egg-shaped center into the chocolate and place on a wax paper-lined baking sheet to dry.

As you can see, I'm no Jacques Torres.

Mom used to pipe frosting rosebuds and leaves onto her candies, making them even more special, but I don't like working with frosting at all so mine remain plain.

My husband, the coconut-hater, suggests replacing the coconut with oatmeal.  Maybe next year.  If you try that, let me know how it works out.

I had a watcher, too, who also likes to perch from the kitchen stool.

Friday, January 23, 2009

Building Laurel's Cake

She requested "yellow cake with chocolate ganache". My pleasure!

The birthday-girl wanted to help make her cake. Here she is mixing the batter. I always put the mixing bowl in the sink because it's easier to reach that way.

Into the oven.


Thirty-three minutes later and voila!


Since the man of the house had a birthday earlier in the month, I had a half-batch of ganache already whipped up and ready for Laurel's cake. Unfortunately the whipped portion, which is used as a crumb coat, was too dry to spread.

What to do? Heating it on the stovetop would turn it into a runny mess. After some thought, I channelled Duff Goldman and "busted out the power tools". A few blasts of the heatgun was all it took and the ganache was workable once more.


Crumb coat applied.


We let the cake chill for a few minutes in the fridge to harden the crumb-coat. Next, we drenched the cake in warm ganache and allowed it to cool again.

I normally decorate birthday cakes with whipped ganache, but I was out. Instead, we placed mini-marshmallows around the bottom of the cake, and used melted chocolate for the rest.

We started by standing a disposable piping bag inside a glass, then filling it with melted chocolate.


I piped out some butterfly wings onto waxed paper, then sent them to the fridge to cool.


I piped the words onto the top of the cake, and arranged the butterflies around the cake using melted chocolate "glue" where needed.

Ta daaaa.

Wednesday, October 22, 2008

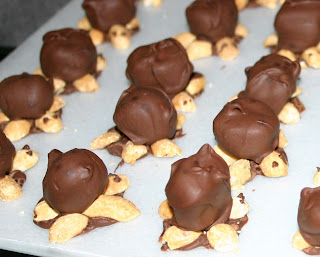
Christmas Turtles


I've been making these edible little cuties for Christmas since my first Christmas as a Navy Wife. They are always a hit, and I've found that making these with children is even more fun!

First, it helps to have a caramel-unwrapper at your disposal. Most 5 year-olds are up to the task. Just be sure to lecture them on the importance of keeping their hands away from mouths, noses, the family pet, etc. while they're doing their important work. ...and it is important work. If the five-year-old won't do it, you may be left to do it yourself and well...it can be a daunting task for just one.  I recommend you start with one bag of caramels.  Choose a brand of caramels that you think is yummy.  I use Kraft brand.


After they've all been unwrapped, cut each one in half. I used to use a whole caramel for these, but by using only half the caramel, it ups the chocolate-to-caramel ratio of the final product. I like that. Feel free to experiment.

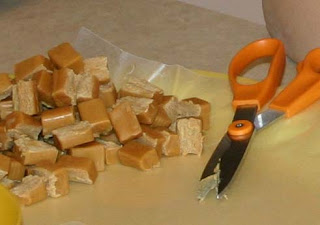
If you'd like to keep your children busy for a long time, have them knock the sharp edges off of the caramels by picking each one up individually and banging it on the table, rotating, and banging some more.  If you're in more of a rush, try placing the caramels on a parchment-lined baking sheet (after cutting them in half) and heating them in a 350 degree oven for just a couple of minutes before shaping them. The heat will make the caramels much more pliable.   Place the shaped-caramels on wax paper until they're needed.


Next step: Turtle Base (feet and head)
Prepare a few (depending on how many caramels you've got ready) cutting boards or baking sheets by lining them with waxed paper.  Do not skip this step!

Melt some chocolate over a double-boiler. Use an amount appropriate to the size of your double-boiler--you can always add more later.  You'll need enough so that the melted chocolate is about an inch deep (or more) in the pan.  I use the old standby, Nestle's Semi-sweet Chocolate Morsels, but any chocolate will do. When it's melted, transfer some of it to a disposable piping bag. If you don't own any disposable piping bags, you could just use a spoon to drop a glob of chocolate onto the waxed paper. I did it this way for about sixteen years before discovering the magic that is the disposable piping bag.

Caution:  melted chocolate is hot.  You probably can't tell from the photo, but I am grimacing because my hands are being burned by the chocolate.  If I were really smart (and I did do this, eventually) I would've donned some gloves before picking up that piping bag.  Learn from me!  Grab some of those cheapy stretch gloves and save your skin.

Create rows and columns of chocolate globs. You'll be pressing five peanut halves into each glob, so leave enough space between each chocolate glob to accommodate those.

This is another step where having cheerful, willing helpers is a great boon. Not only do the peanuts (I use dry roasted peanuts, the lightly salted variety) have to be separated into halves, but they have to be arranged in a star-shape. It's labor-intensive! Gather as many helpers as you can.  Make them tie up their hair, if necessary.

After all the little turtle bases have been assembled, let the chocolate harden for several hours before moving to the next step.  Find the coolest spot in the house, and set them there.

Step Next: Enrobing
My best advice for this step is to not let the chocolate get too hot. Cycle the burner on and off throughout the process. Stir the chocolate often. If you know how to temper chocolate, do it. I have made many attempts at tempering, and have had varying levels of success. Your turtles may show some bloom (white spots on the chocolate) after a few days, and that is a sign that the chocolate wasn't properly tempered. Blooming does not affect the taste or texture of the chocolate in any way. If you eat them within the first couple of days, bloom will never reach your turtles.  I've found that covering the trays of turtles helps to reduce blooming.

To do the enrobing, drop one caramel into the chocolate, scoop it up with a long-handled teaspoon then use a chopstick (or whatever you find handy) to turn the caramel over in the bowl of the spoon.  Coat it completely in the chocolate, then transfer the enrobed caramel to the waiting tray of turtle bases, and ever-so-carefully use the chopstick to slide it off of the spoon and onto the center of one of the turtle bases.  Splendid!

When the enrobing is finished, all that's left to do is add eyes.  Dip a skewer or toothpick into melted chocolate and add two little dots of chocolate for the eyes. This is where having them lined up in rows and columns comes in handy.  If the turtle bases were created in a random pattern initially, it would be more difficult to place the eyes--you could very well end up with blind turtles, or turtles with two heads.  (Note that the deliciousness would not be affected in any way, were this to happen.)

After a couple of hours, depending on the ambient temperature, the chocolate will harden and you will be able to easily peel each turtle away from its waxed paper mooring. I recommend keeping these in a cool area of the house until you're ready to plate them.  These little guys are remarkably sturdy and look great marching across a platter of cookies.

Enjoy!

Saturday, September 13, 2008

Cake in a Mug

Here's a fun way to make a quick dessert. It's so easy, a kid could do it. I hesitate to show this to my own kids, for fear they'll be whipping these up every day. If you try it with yours, let me know how they liked it. ;)

I got the recipe from Cheryl at nfptalk.

You'll need:
1 Coffee Mug that can withstand the magical forces of the microwave
1 Fork

Ingredients:
4 Tablespoons All-Purpose Flour
4 Tablespoons Sugar
2 Tablespoons Unsweetened Cocoa Powder
1 egg
3 Tablespoons Milk
3 Tablespoons Vegetable Oil
3 Tablespoons Chocolate Chips
1 Teaspoon Vanilla Extract

Directions:
Coat the inside of the mug with cooking spray. Add dry ingredients to the mug and mix well with the fork. Add the egg and mix thoroughly. Add the milk, oil, and vanilla and mix again. Stir in the chocolate chips.
Place mug in microwave and cook for 3 minutes on full power (depending on your microwave...mine is 1100 watts).

Ooh and ahh as the cake puffs up beyond the constraints of the mug! (The photo didn't turn out. You'll have to use your imagination.)

Serves one. Or two if you're the generous sort.

Perhaps it would be better to serve it in the mug.

Monday, August 4, 2008

He Even Makes Coffee

If I haven't mentioned it before, I'd like you to know that I have a great husband. There are many examples of his fabulousness, but the most recent is his ability to make frozen coffee drinks for me. Yesterday was his first attempt, and HOLY COW. He did good.

Today he got home from work a little early and decided to see if he could replicate his earlier success. He did! I am a lucky, lucky wife.

He claims that there is no magic involved, so maybe these steps will work for you, too. I will close my eyes while I post this. If I learn this process myself, I may never drink anything else.

Patrick grinds his own beans and his instructions say "full coffee grinder, 6 cups in coffee maker". I believe the translation for that is "make some really strong coffee". Pour 1 to 1-1/2 cups of chilled coffee into your blender along with 1/2 cup of creamer.


Add 4 teaspoons granulated sugar, and 1/3 cup chocolate syrup. Pulse to blend.
Fill the blender to the 8-cup mark with ice cubes. Hit "puree" and blend for about one minute.


Pour into a tall glass and add a jumbo straw that you saved from Panera for just such an occasion.


MMMMMmmmmmmm frozen goodness.

Friday, July 11, 2008

Birthday Cake Tutorial

Step one:
Bake some cakes. I used box mixes this time, due to a butter shortage I didn't know I was having. These are Duncan Hines Chocolate Fudge, which is my favorite box mix.

This day I was trying out my new 5" round pans. It turns out that half of the box mix filled the two pans nicely. I used the other half to make a dozen cupcakes.

Step Two:
Make an insane amount of ganache. I used the recipe in Martha's baking book, which makes about 7 cups. I had enough to coat and decorate an 8-inch tier cake, a 5-inch tier cake, and a dozen cupcakes. There is also about a cup left in my fridge right now.

Step Three:
Chill half of the ganache. I poured half of the hot ganache into the bowl of my stand mixer, and put the whole thing in the freezer for hmmm...a while...probably 20 minutes. Normally when I take it out and try to whip it up, it doesn't whip well, so I end up returning it to the freezer for another stint. After two or three more tries, it whips up beautifully and I have to resist the urge to dive head-first into the mixer bowl.
Leave the remaining ganache in the pan. We’ll return to it in a later step.


Step Four:
Devise a make-shift cake stand. Those of you lucky enough to already own an appropriately- sized pedestal can skip this step. An inverted lunch plate double-stick taped to an inverted cereal bowl worked well for my 5” diameter cake.

Steps Five, Six, and Seven:
Level your cakes, if necessary (or even if not necessary...maybe just do it to give yourself some cake remnants to sample) with a serrated knife. Place one layer of cake on a wire rack and coat the top liberally with whipped ganache. An offset spatula is a handy tool for this job. Carefully place layer two on top and coat all visible cake surfaces with the whipped ganache.

This is your chance to correct any surface defects in the cake--whipped ganache is sort of like cake spackling. You won't be sanding the cake though. You'll have to make do with just the spatula.

When you think you've got the thing as smooth-looking as possible, place the cake in the fridge for thirty minutes or so--enough time to allow the coating to stiffen.

Step Seven-Point-Five
If you want to induce a chocolate coma, add another coat of whipped ganache after the first coat has hardened. Chill after applying, as before.

Steps The Rest:
Remove the cake from the fridge and place the cake—wire-rack and all—on a sheet pan. Photos would be helpful here, but ha! There are none. I apologize.

Remember the ganache you left in the pan up there in step 3? Check that it is still warm. You want it to be in that magical temperature range where it is easily poured, but not so warm that it melts away the whipped ganache coating on the cake. You may need to rewarm it slightly.

Pour the ganache onto the cake. Marvel as it spreads and drips down the sides of the cake. Gravity will coat the entire cake for you—just keep pouring until the cake is completely covered.

Now place the cake (still on the sheet pan) in the fridge again for another twenty to thirty minutes. Feel free to use this time to "clean" any remaining ganache off of the mixer attachments, rubber spatulas, bowls, pans...

When the outer coat of ganache has firmed up, it’s time to transfer the cake to its pedestal. Use an offset spatula in a sweeping motion under the cake to encourage its removal. Grab a pancake turner in one hand, and an offset spatula in the other and ever-so-carefully, pick up the cake and set it on the cake stand. This is not a job for the faint of heart, but the less time you spend thinking about it, the better off you’ll be.

All that’s left now is to decorate and enjoy. The whipped ganache can be piped, but you’ll need to work fast or it will turn to mush. Refrigerate the cake. Remove from fridge and let stand for 20 minutes before serving.

Did you read that last sentence? I just want to be sure. Trying to slice into a cake of this sort that hasn't been allowed to warm up can ruin the look of your lovely cake. It will still taste wonderful, however.

Use a spatula to recover the ganache in the sheet pan. This is the stuff that slid off the cake during the coating process.

Store the extra ganache in the refrigerator in an airtight container. Rewarm it a tablespoon or twelve at a time for a heavenly ice cream topping.