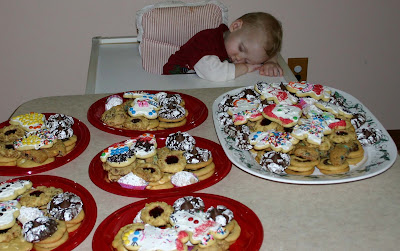
We make dozens and dozens of cookies each year. It's one of my favorite parts of getting ready for Christmas. This year I had lots of help from Patrick and the kids.
These are some reflections about things I learned this year. I always learn something, even if I am making the same varieties year after year.
These thumbprints, for instance, could be spaced much closer together than the recipe states. Two inches apart...what were they thinking? They don't expand that much.
Also, filling these babies using a squeeze bottle for the jelly worked like a dream.
Next, Mexican Wedding Cakes. I may never make these again. What a mess! Some of them crumbled during the coating process, breaking into a million pieces and causing me to make unkind remarks about their brittleness. The recipe called for baking at 300F for 40 minutes. Forty minutes? Who has that kind of time. I baked them at 350 for 12. Maybe that was the problem. Still. These things are sticky after the first coat of powdered sugar, and fragile. I decided to put them in mini-parchment cups to control the mess. The second coating came via a sugar-shaker.
Next up, the family favorite: Carolers. These are a not-sweet cutout-cookie, meant to frost and decorate. I watched an episode of Martha recently where she touted the ease of rolling out any variety of cutout-cookie dough onto a silpat, then placing that onto a baking sheet, cutting out the shapes directly and whisking the whole shebang into the freezer for a couple of minutes. She then removed the "negative" pieces of dough and baked the cookies as usual. Oh, this sounded like a real time-saver.
Ha! and Double Ha! What it was, was a mess. I ended up using my offset spatula to clear the baking sheet of all dough and starting over with my own (tried and true) method. Witness the simplicity. Even a child can do it.
First, place a piece of plastic wrap on your work surface. Scoop out a heaping tablespoon of chilled cookie dough onto the wrap. Place another piece of wrap on top.
Use your super-wham-o-dyne pastry sticks (not sure what these are called, but you can use square moulding too, which is commonly available at hardware stores) to guide your rolling pin and achieve a uniform thickness of dough. Note that with this method, you only roll out enough dough to cut one cookie.
Remove the top layer of plastic, cut out your cookie, then use the bottom layer of wrap to lift the cut-out from the workspace and in one fell swoop you are able to remove the "negative" dough, and deposit the "positive" dough onto your prepared baking sheet. Viola! A perfect cut-out.
Though it may not seem that way from the written description, I think that this method is faster than the traditional method, and certainly more successful (for me anyway) than Martha's method. Once you get a rhythym going, you'll be filling baking sheets in no time flat.
Incidentally, the way I like to decorate these types of cookies is to frost with white, then decorate with sprinkles, m&m baking bits, nuts, nonpareils, etc. The kids get very creative. Can you make out the word "peace" spelled out on the girl's dress below? The bonus for me is that it doesn't require the mixing of twenty-seven different colors of frosting.
When all was baked and decorated, we wound up with eight varieties of cookies, plus many dozens of turtles to build our cookie plates.
Liam got exhausted watching all the action.
His favorite are the date-nut pinwheels.
Saturday, December 20, 2008
Baking Notes
Posted by
Sleen
at
7:38 PM
![]()
Labels: baking, Christmas planning
Subscribe to:
Post Comments (Atom)


1 comment:
Hi Celine,
It is great to communicate with blog.
The kids are precious and they are looked having a lots of fun. Uh uh, Liam fell in sleep.
I am tired being trapped in the house too, because the snow. Someday I'd like to live in Hawaii at least three months.
Thanks much for the photos.
Hope to see you guys, maybe New Years Eve?
InSoon
Post a Comment